
Recipes from the OBGG Test Kitchens
Quality, not quantity. That's how we do!


We will be posting some of our favorite recipes here.
Some using our products,
Some that our stuff will be great with or on and some that we just want to share with you!
Cheers! And enjoy the scrolling!
Chefs Vince and Cutter
Recipe Jump links
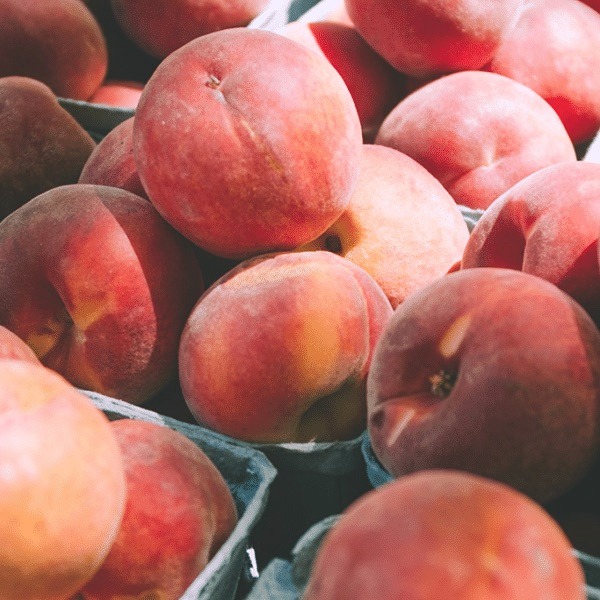
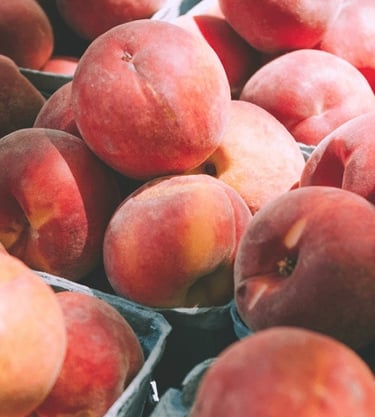
OBGG Peach Marmalade
Chef's Vince and Cutter were recently invited to a party for some traditional Hungarian Goulash (which was phenomenal I might add) and our hosts literally turned their backyard into an orchard, filled with Citrus, Avocados, Peaches, Grape Vines etc. We were seriously impressed.
So we are talking peaches today, but this recipe can easily be translated to any fruit you have too much of, or combination of many fruits.. You know what you like! Anyways, this recipe is for marmalade which means we will use the skins. This is optional, in which case you will be making Jam :) Here nor there, but I believe using the skins gives it a more appealing reddish color and adds a little extra peach flavor.
What you need:
Large pot, large mixing bowl, potato masher, instant read thermometer
3 Kilos of Peaches
5x Vanilla Beans
3x large Granny Smith Apples
500g White Sugar
500g Brown Sugar
25ml bottled lemon Juice (for acidity)
Sterilized Mason Jars
Optional:
5 cups or so of your favorite whiskey
We will be cooking the marmalade completely so there will be no alcohol in the finished product, but we understand if you want to leave this out.
How you do it:
1) Prep the peaches by giving them a good cleaning with warm water and a brush, peaches get dirty with all their fuzziness.
2) Halve and pit the peaches, then cut them into around one inch chunks (2cm).
3) Carefully halve the vanilla beans and gently scrape out the seeds (Both are going in its just wont flavor right if you don't do it in prep)
4) Peel and grate the Granny Smith's, these bad girls not only give it an extra kick of flavor but they are high in Pectin which will help the marmalade gel. You can use a teaspoon of packaged pectin if you can't find Granny Smiths where you are.
5) Combine all your ingredients (including the whiskey, substitute filtered water if you like) in a large bowl, and I mean mix it up! Get everything coated with everything. Cover and let it sit overnight in the fridge. This will allow the sugars and acid to start breaking down the peaches and draw out some water.
6) The next day dump everything in a large pot, use a spatula to get it all (including the water) in there.
7) On medium high heat, bring the mixture to a boil stirring often to make sure nothing burns. Once the sugar completely dissolves (around 10 minutes) reduce to a simmer until the peaches are nice and soft. Turn off the heat and remove the vanilla bean (not the seeds)
8) START MASHING BABY! Now I like it pretty chucky so using the potato masher is the best way to get the consistency I like. I however, know I'm not everyone, so you can put it all in a blender and you won't feel me judging you :)
9) Once you have it the way you like it, bring it back to a boil over medium high heat stirring and skimming off the froth the builds up as you go. It's really important to bring it up to 220 degrees (105 Celsius) especially if you don't have a pressure canner.
Jar them up and you're good to go!
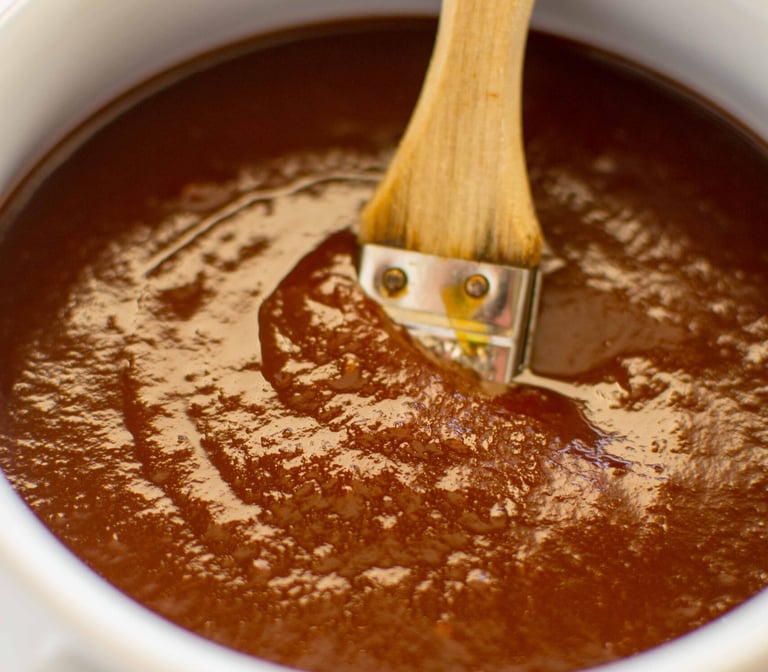
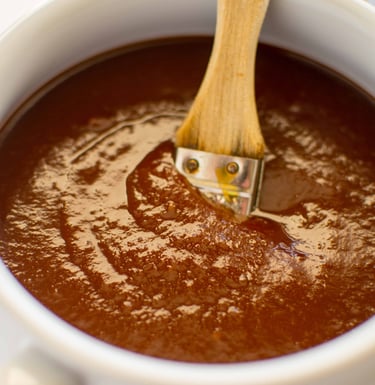
Keep scrolling and see how we use this for our awesome Peach BBQ sauce
It's fruit picking season out here in sunny drought ridden Los Angeles which I believe means the growing seasons are going to get shorter so less time for eating. So let's get preserving!
Grandpop Walters Whiskey Peach BBQ Sauce
How you do it:
1) Dice up the onions, peppers and garlic and sauté on medium heat. Get the onions and peppers going first, when you see them start to brown add the garlic and fry till fragrant. If you are using tomato paste, give that quick fry to remove any tin taste that may be lurking in there.
2) Transfer everything to a blender and use a spatula to get as much of the oil as you can. That stuff is preciously good! on whatever is your highest setting do your best to liquify it.
3) Return the mixture to a sauce pot and mix in all the ingredients except for the OBGG Peach Marmalade. Simmer slowly on medium low heat stirring occasionally for at least an hour until the sauce clings to the back of your spoon.
4) Stir in the marmalade a little bit at a time (I do about a tablespoon) until you get the perfect amount of peachy taste. You'll likely use the whole 2x cups, but sometimes the sweet takes away the spicy, only you know how you like it!
Now if you want to turn this in a sauce for wings which I highly recommend. reduce the sauce by a quarter and add a little more honey for a sticky glaze.
What you need:
Large sauce pot, Blender
2x large sweet onions (I use Maui Sweets, but Vidalias are easier to get most places)
4x Cloves of Garlic (or use the whole bulb if you are like me)
5x Birdseye chilis (optional)
Cheap olive oil or Grapeseed oil for sautéing
2x Cups of tomato sauce
2x tsp smoked paprika
2x tsp ground Thyme
1x tsp Black Pepper
1x tsp Fine salt
1x tsp Nutmeg
1x tsp Chili powder
2x tsp ginger
1 cup of honey
1/2 cup of Apple Cider Vinegar
1x cup of Worcestershire sauce
2x cups of packed brown sugar
2x cups of OBGG Peach Marmalade
Optional:
1x cup of your favorite whiskey
2x tsp of tomato paste if you like an extra tomato kick
So you've made yourself some delish peach marmalade, now its time to perk up the pork butt with some sweet and spicy sauce! This is definitely a throw back to Chef Cutter's east coast days. In fact I believe it came from Grandpop Walters! The originator of some of the most legendary chili I swear to Cheebus I haven't tasted the like in the 30 years or so since he passed on. Anyway BBQ sauce is super easy to make, I don't understand why people bother buying store sauce (Except for the OBGG BBQ sauces of course) so this will be a quickie. Buy some OBGG sauces though, seriously we're poor :)
Melanzana Ali Olio
Here in Los Angeles we have totally become a hub of urban farming and so many of our friends are maintaining bountiful gardens!
Here at the now OBGG Kitchen LLC we hope to help out with not only preserving what you grow but showing you how to do it yourself if you are so inclined.
Melanzane is a classic Italian side dish that adds some wonderful spice to sandwiches, bruschetta and pairs beautifully with marinated meats— and makes for a really flavorful antipasto.
Unfortunately because of the nature of the beast, in this case Aubergine!
(We really should start calling eggplant this) This recipe takes a lot of time and elbow grease.
What you need:
Large pot, colander, a bowl for pressing and something to weigh it down
2. 5 kg Eggplant
1 liter of water x2
1/2 Liter of white wine or rice vinegar x2
1 Crap load of sea salt/kosher salt
Real Extra Virgin Olive Oil
Sterilized Mason Jar big enough to fit everything
Then a whatever you like to pickle with, In this case we used
Fresh Basil, Fresh Parsley, Fresh Bay leaf, Crushed Garlic, Birdseye Chili, Red Pepper Flakes,
Dried Oregano, Turmeric, Thyme, Black Pepper Corns
How you do it:
Not going to lie to you. This is a long process but we have faith in you!
Let's get ready to rumble my poppets!
1) To prep the eggplant first cut off the ends and peel it. Some people like to keep the skin on, some don't, you do you! Then cut the fruit into strips around the size of a French fry. (I also recommend taking a few of the veggie fries and frying them in some grapeseed oil and salt for midnight snaking)
2) In al large bowl, start layering the eggplant with a good handful of sea salt between layers. don't be skittish we will be rinsing all the salt off tomorrow, so go to town with the salt.
3) for the next few hours let it sit, giving it a gentle turn ever hour or so and draining the water out of the bowl. finally you'll want to give each a good squeezing to get whatever water you can out.
4) Before going to bed that night you'll want to set up a makeshift press in your sink. I layer the eggplants on a large colander and the place glass bowl on top and weight it down with a couple jugs of water. just make sure you bowls can handle the weight and let it press out over night.
5) The next day. in a large bowl make a 2 to 1 mixture of water to vinegar. We used Rice wine vinegar for this batch, but any flavor you like will do. Then rinse and squeeze all the salt off the eggplant. do this for about 5 minute and let them rest in the solution for about 20 minutes.
6) Next make another water/vinegar solution in a large pot and place the eggplants in. On med high heat bring it to a boil and immediately cut the heat and then let cool to room temp.
7) The last step before jarring is you guessed it.. More squeezing. Now the eggplant is pretty soft at this point so be gentle not to mush it. with good handshake pressure squeeze it in bunches and place on a a wire rack or pain to drain a little more.
8) Now we jar! I go in layers with this as well. I always start with garlic and bay leaf on the bottom, egg plant, the dry spices and chopped herbs, eggplant and so on. It's not totally necessary to be anal about it but I like it to look pretty. Make sure to press down the layers to get as much air out as possible.
9)When you are done with that just fill the jar with EV Olive oil all the way to the top, as you go keep pressing out the layers until the air bubbles stop coming up. Wipe the lids and top of the jar with vinegar to kill any mold that might have landed there and close it up!
The hard part is you'll want to keep it in the fridge or dark cool place for a month before you break into it


Our friend Fafa recently blessed us with part of her eggplant harvest I struggled with competing desires to pig out on eggplant parm for a whole week or do something new and exciting with our bounty. Turns out I could do both!
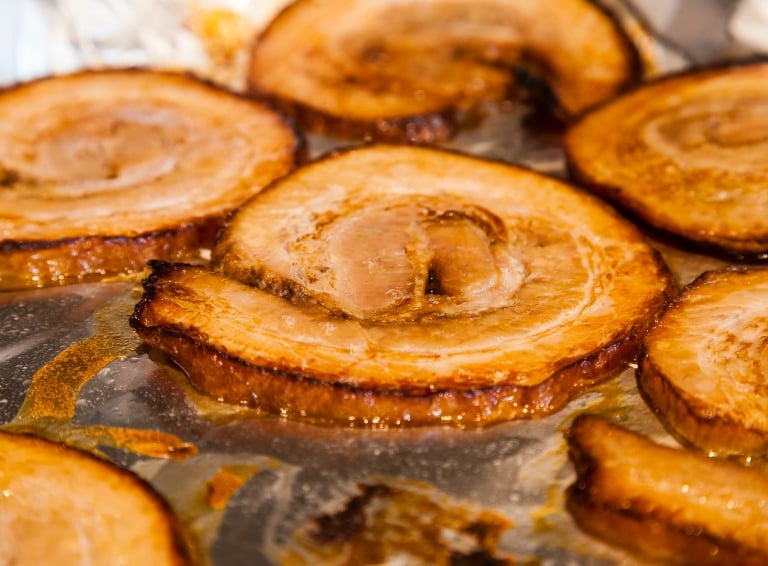
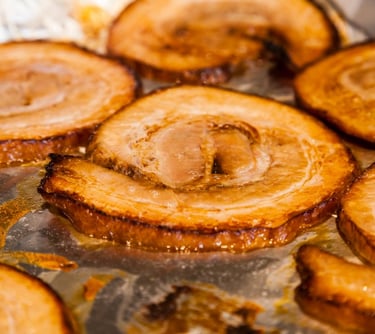
Chashu Pork (kind of)
How you do it:
1) First as if it needs saying thoroughly wash the pork with warm water to get any blood etc off. If you are using a skin on belly lets start off by scoring that bad girl. With a sharp knife make cuts just below the skin (but not through the fat) about 1 inch apart diagonally down the belly then rotate 90 degrees and repeat making a diamond pattern. Skin off you can skip this step or go for it its all good!
2) Next take your rubs spices and give them a quick toasting in a dry skillet over medium heat for about 2 minutes and transfer to a mortar and pestle or spice grinder. Grind in fine enough to find the meats little knooks and whatnot, kind of like drip coffee size.
3) Flip over the belly and pat it dry with a paper towel if needed. Sprinkle the rub evenly over the belly, I like to think opf myself being an old timey typewriter.....sprinkle sprinkle sprinkle DING! and then rub it into every little nook and cranny, really give your hands a workout on this!
4) Now its time to roll it up. depending on size pre cut your twine so you have enough to go all the way across in about 1 inch apart. Now I like to place 3 or 4 cloves of garlic right in the middle of the belly where the top hits the middle as you start the roll, but as I said, optional. Anyway roll it tight and tie it tighter!
5) Get your Dutch oven ripping hot on your stove top with a couple tablespoons of vegetable oil (I use grape seed) and sear one side of the log at a time until all sides are nicely browned. This step should take about 12 mins or so, don't rush it. You crock pot users, same thing on the sauté setting...... fancy pants :)
6) When that's done turn the heat down to medium remove the roll and pour out any oil/liquid and give it a quick wipe with a towel, careful not to burn yourself like I always do. then add back the belly and all the rest of the ingredients and mix well with a wooden spoon. Make sure the braising liquid goes halfway up the pork belly, if your low add more water or wine, if your high, no big thrill , just keep the the lid off and let it evaporate a bit.
7) Now at this point you want to watch it closely as it comes up you a simmer (NOT A BOIL) and skim off and foam that appears along the way. once its there, cover and turn the heat down to medium low. the rest is easy street! Give it a turn every 30 minutes or so for the next 2 to 3 hours, basically you want to cook it until about half your braising liquid has simmered away (NOT BOILED)
8) Now Very carefully remove the belly, it going to be soft as hell and will fall apart if you're not gentile and place it on a wire rack are a cutting board with a moat.
9) Now you can take a break if you want to, its been a trying day bit you still have to pour all the remaining braising liquid through a sieve and remove all the solids cause your going to need for your ramen eggs (see Below) also make a spectacular gravy for Bahn Mi sandwiches etc. Anyway save it, you will need a cup or so tomorrow when we torch the slices.
10) Once its rested for an hour or so place in the fridge in a covered glass container overnight is best, but at least 3 hours so you can slice it with out it falling apart. When the time comes slice into around half inch slices, but you know that's only a suggestion, you do you. Give both sides a light brushing with the leftover braising liquid and either place in the broiler for 3 to 5 minutes until browned or if you're a fancy pants like me hit with your butane Crème Brulee torch to get it all crispy!
There you go Ramen ready my poppets!
What you need:
1 cup (240 ml) sake (buy you know, knock yourself out)
1 cup (240ml) Pinot Grigio (or fav sweet white wine)
2 cups (480ml) filtered water
1/2 cup (120ml) soy sauce
1/4 cup (50g) sugar
6 scallions, roughly chopped
6 whole garlic cloves (I double that usually, but I love me some garlic)
One 2-inch knob ginger, unpeeled, sliced into 1/2-inch-thick pieces
1 large shallot, unpeeled, halved
2-pound (900g), Skin on slab of boneless pork belly (Skinless is also fine, you do you) (We get our bellies from Costco which range from 10 to 15 pounds but Asian markets will sell them smaller)
1/4 cup (50g) Kosher salt, whole black pepper corns, dried basil and red pepper flakes (for the rub)
Butchers twine, Dutch Oven or Instapot for you fancy pants people!
Note; all the liquid measurements are subject to the size of your pot, you will need the braising liquid to half immerse the belly)
With the release of the OBGG ramen kit we've gotten a lot of folks asking for our Chashu pork belly recipe from our testing photos. Well I got to be honest, Chef Vince made that and he's on vacation at the moment so you'll have to settle for my less authentic recipe :)
Like many of my recipes I borrow a little from here and there. In this case Italian Porchetta, but if you want to go super traditional check out Adam Liaw here, He's a fancy pants like you and more talented than I. You Fancy Pants traditionalists!
https://adamliaw.com/recipe/ramen-school-002-three-styles-of-chashu/
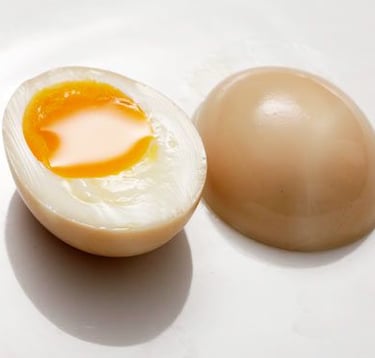
The "should be simple but its not" Seasoned Ramen Egg (Ajitsuke Tamago)
So here you are! You have almost everything you need. OBGG got you the super nutritious Tonkotsu Bone Broth, The smells like the ocean soup base, Alkaline noodles! You may have even ventured to the market for some woody mushrooms and some pork belly! But the egg, that magical egg has you stumped. Well have no fear, Chef Cutter is here for you!
As with many things in Asian cooking, Timing is everything!
Don't fear, if you screw up the egg the first time around It's still awesomely edible. Too hard?? Egg salad, too soft? Poached egg.
Point is, you'll be just fine and you have another 11 tries to get it right!
What you need:
Small pot of boiling water
6 room temperature large eggs
Some kind of eggshell hole poking tool (I used the tip of my meat thermometer)
Ice water bath
A good egg peeling spoon
1/2 cup soy sauce
1/2 cup mirin
1 cup cheap sake
1/2 cup sugar (or sweetener of choice)
If you have some Braising liquid from the pork belly you made last night, go with a half cup of that!
Otherwise 1/2 cup of vegetable stock
A thermometer helps
How you do it:
So if you are a fancy pants with a Sous Vide you already know you can make the wonderful eggs you get at the fancy pants restaurants you go to all the time by cooking your eggs at 145°F for about 45 minutes or so, you fancy.... fancy pants person.
For the rest of us;
1) Get your water just barely boiling, 190 degrees if you have a thermometer, Just a wisp of steam and a tiny bubble.
2) Get your Ice water bath ready, you'll want to stop these bad girls from cooking toot sweet, so make sure your bowl is big enough to swirl around the eggs.
3) Gently poke a small hole in the base of each egg (this will make it easier to peel later)
I cook with a German so precision has been distilled to me by osmosis so My exact perfect cooking time is 5 minutes and 45 seconds but the world wont end if you go 6 minutes or so. Anyway
4) Gently drop the eggs in the wispy simmering water and start your clock giving them a quick stir every 30 seconds or so. when the time is up immediately put them in the ice bath and again stir them around a bit until they are cold.
5) While the eggs are chilling, mix up the Sake, Soy sauce. Mirin, Sugar and Stock in a small bowl or Ziploc bag.
6) All that's left to do is peel those eggs. There are a million ways to do this, I like the spoon method but you do you. DO NOT go down the YouTube rabbit hole on this subject! You can thank me later.
7) If you are using a bowl to marinate place a paper towel over them to keep them covered with the liquid. If you are using a bag, remove as much air as you can before sealing. Then just leave in the fridge for at least a day before you steal one for a midnight snack.

On the release of the OBGG Ramen Kits, it has come to my attention one reason you all don't make this all the time is because of the bloody egg!
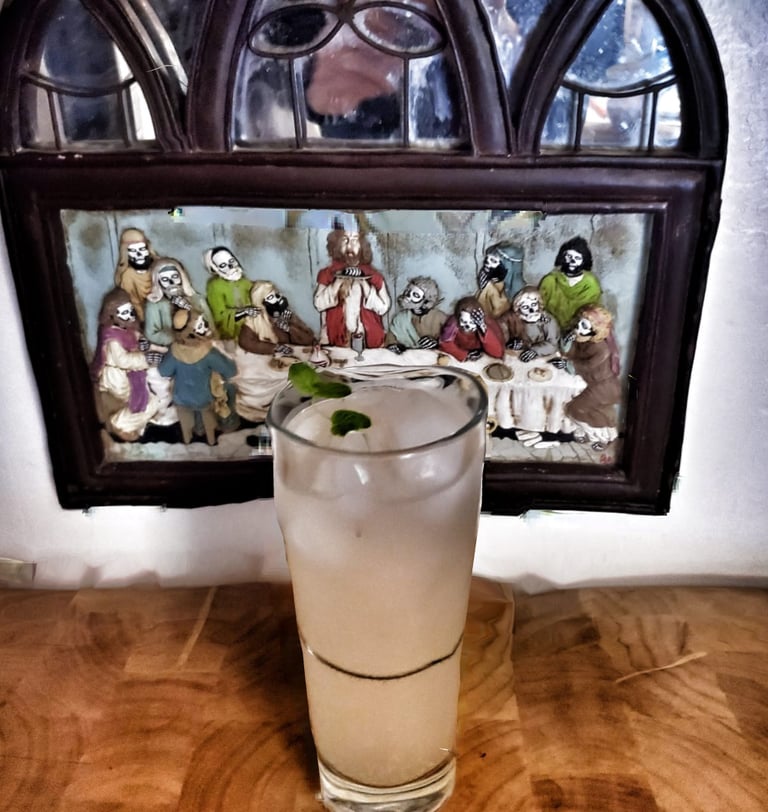
Rhonda's Cocktail Genius
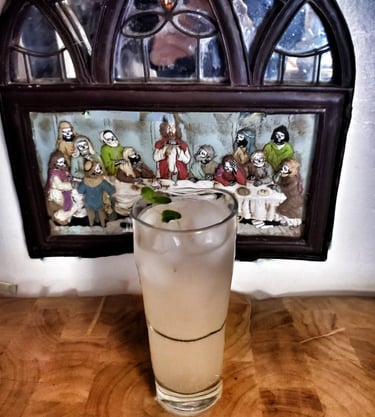
How you do it:
1) Place the mint leaves in the bottom of a cocktail shaker or large metal cup or bowl. Using a cocktail muddler or unfinished wooden spoon, gently mash the mint 3 to 4 times to release the juices
2) Add 1 or 2 ounces of OBGG Limoncello depending on how strong you want it.
3) Add a can of Lemon hard seltzer of your choosing and give the concoction a stir with a cocktail spoon or other stirring type utensil
4) Strain over ice and top with a splash of strawberry lemonade and a sprig of mint
And VIOLA a refreshing summer cocktail that's maybe not a religious experience but Rhonda sure thought so!
What you need:
OBGG Limoncello in D Minor
2 or 3 sprigs of fresh mint
Lemon white claw or favorite hard seltzer
Strawberry Lemonade (I use the Simply Brand)
Ice
Cocktail Shaker kit helps but one can do without :)
We love it when our customers get back to us with their creations!
This Super yummy cocktail comes from Rtwo and after trying it myself I figure sharing with all of you was the least I could do!
Also you all need a reason not to pound shots of the Limoncello!
“That smells amazeballs Cutter, feed it to me right MEOW!” Miso Pesto
As you know I had just finished a yearlong Miso ferment and had to test it out to make sure it doesn’t poison you all. First thing I did was make a simple soup. Hot water, spring onion and tofu. Didn’t die, so I started using it with everything that I need salt for, salad dressing, popcorn butter, an omelet, even mixed up a batch of mayo secret sauce with it…all not only didn’t kill me but made me happy.
Then I looked up miso dishes on the interwebs and F* Me people have been using Miso to pervert traditional dishes for quite some time…Like, everything in Julia’s book, all with vaguely racist Mi So - fill in the blank- names. But I was intrigued by Miso Pesto, so off to Costco Bus Center I go!
I then Invited my friend over for dinner, just to make sure I’m not immune to poison (yes I warned her) and to make a long story short, The title of this recipe came out of her mouth and almost fainted laughing.
What you need:
4x good handfuls of fresh basil (4 or 5 cups)
Optional - I had some leftover super greens salad mix I threw in there, this is a great recipe to use those slightly less than crispy leafy greens we all have in our fridge.
4x cloves of garlic peeled and smashed
1 cup of toasted pine nuts
2 tbsp of OBGG Miso Impossible Paste
1 cup of extra virgin olive oil (use real EVO)
1 Tsp of rice wine vinegar
10 oz of ramen noodles (two packs usually)
Optional- a teaspoon of sugar if it’s too salty
Garnish
1 Tbsp of toasted sesame seeds
Optional- A couple seasoned soft eggs
How you do it:
1) Get a pot of salty water boiling and follow the package instructions for your ramen…they’ve tested it, they know
Meanwhile break out your blender, you can use a food processor but the blender is the way to go.
2) Give your pine nuts a light toast in a dry cast iron pan, about 1 minute on high, set aside and toast those sesame seeds for around 30 seconds.
3) Add all your dry ingredients (yes including the Miso and garlic smartass) and give it a few pulses to chop it up then blend on low and SLOWLY drizzle in the EVO and you’ll see it start to thicken up. Crank up the speed to the highest until everything is broken up and creamy.
4) Give it a taste and add the vinegar. If too salty add the sugar or add more miso if it needs it. And blend on high ‘till your satisfied.
5) Reserve a ladle full of starchy water (about 1/3 cup.. This is something you should get used to cooking the OBGG way) and drain the noodles. In a large bowl combine the pesto and the noodles until everything is nicely coated. Add some starchy water to loosen it up if it’s too thick.
6) Divvy up the pasta and garnish with sesame seeds and a halved seasoned egg.
If you want to be fancy, add a few fresh basil leaves and a couple lemon wedges.
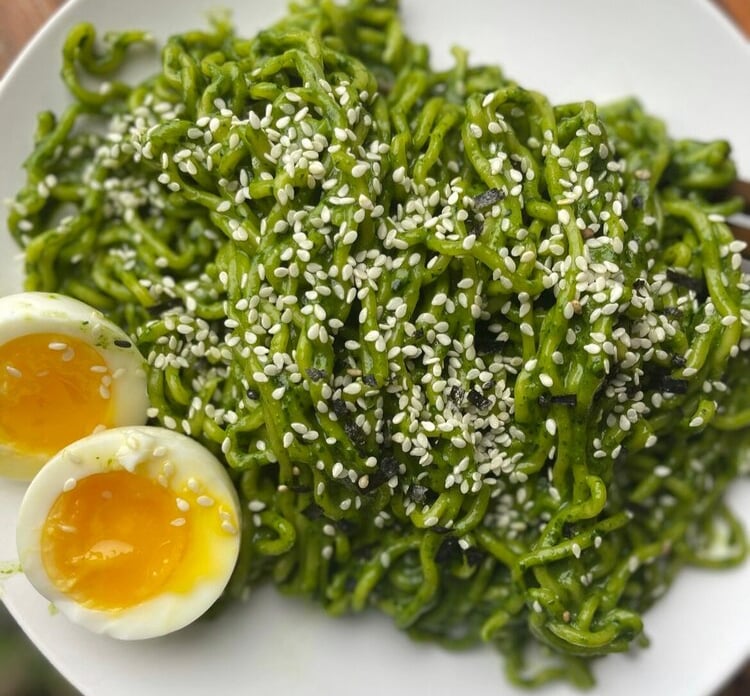

Since I seem to be on an inauthentic Italian cuisine kick, I shall share with you my latest trip down this particular rabbit hole.
A quick declaimer from the OBGG test kitchen.
This isn't the super fresh garlicy pesto you might have had in the past. The miso gives it a very earthy savory-ness that will take you by surprise. I personally loved the toothy ramen noodles which I have never used without soup before. It's going to take a few more experiments before I think it's truly ready for prime time, but my guest loved it and I think you will too.
Anyway, if you are looking for something really interesting to try with our Miso Impossible Paste I reccomend giving this a go with your own personal spin!
OBGG Smoked Bacon Carbonara
I’ve been on a journey with Carbonara that started almost 30 years ago when I stopped in Rome for a few days on my way to the Greek Isles. After walking around all day my friends and I stepped into a little café way up in the north center far away from anything remotely touristy. Both luckily and unluckily for me the chef was practicing carbonara for a for a wedding party and needed to get his technique down for really large portions of the stuff. That asshole cooked plates for the six of us in about five minutes and it was one of the best things I had ever tasted. !Che Culo!
To this day I still only get it right 4 out of 6 times, The problem is when you get it wrong you are out some very expensive ingredients. Authentic Carbonara uses Guanciale, which you can’t get easily in the states, Pecorino Romano which you can get but $$, real Parmesan $$$$ and Bucatini which you would have to make yourself. Lets just admit to ourselves that authentic Carbonara is beyond our collective food abilities, So I made a recipe for the masses that we can all easily procure in the US of A!
But if you find yourself in Rome…
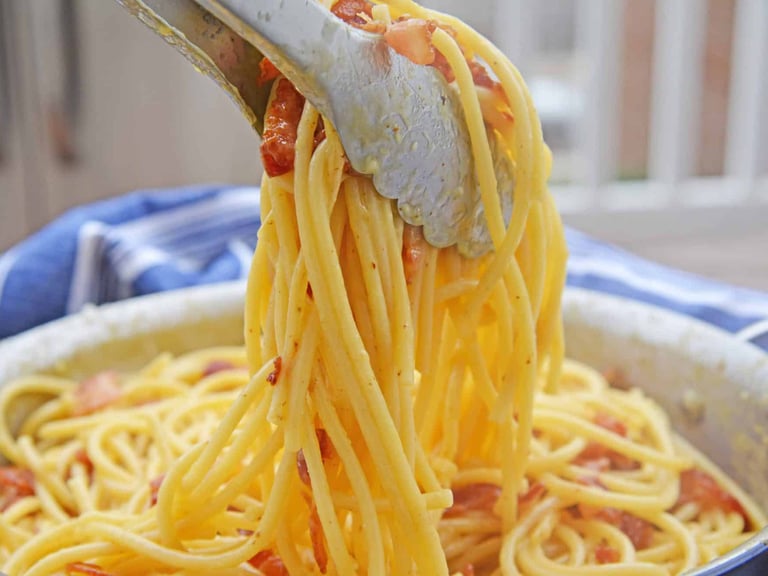

How you do it:
1) Lets start with making lardons (Lardon is just a fancy word for slab bacon sliced into matchsticks) aim for 1/4 inch x 1 inch but don’t stress about even a little bit.
2) Place this goodness in (I cant stress this enough) a COLD skillet! I use my cast iron, but any ole thing will do. Turn on heat to medium and cook stirring until most of the fat has rendered out and its starting to brown, probably around 8 to 10 minutes. Turn off the heat and hit those bad girls with about 5 cranks of ground pepper 1/2 teaspoon or so. Transfer it to a sieve to drain and cool down, Save all the damn fat, it’s precious for Cheebus’s sake.
3) Now for the Cream! Crack 1 whole egg into a small glass bowl and separate the yolks from the other three and add those (save those egg whites for an omelet in the AM) and whisk them together until smooth. Slowly add in the cheeses while whisking and watch your mixture emulsify a bit into a nice cream. Cover with plastic and set aside.
4) Start a large pot of seriously salted water, like ocean salty! Trust me! Now you want to cook your pasta all the way al dente because you wont be cooking it in a hot marinara sauce later, this is all she wrote. About 12 minutes for dried about 3 minutes for fresh pasta.
While the pasta is cooking you will want to prepare for the “Frenzy” as I call it and the timing really is everything, If those eggs scramble even a little bit it’s all over, well not over, it’s still edible but you get my drift. It might even be worth recruiting a helper on this last part.
5) On LOW heat and in the biggest skillet you have heat up those lardons with about half the rendered bacon fat and get it to that first little sizzle (about 2 or 3 minutes)
6) Next get everything in arms distance because shit is going down.
OK the M*** F*** FRENZY (The whole thing should be about 5 minutes)
7) Kill the heat and grab the pasta with tongs or a pasta spoon right out of the pot into your skillet, Don’t drain it, you want the pasta dripping wet! And toss it, stir it whatever you have to do to get it coated in warm bacon fat. As soon as that’s done, turn off the heat and immediately…
8) Grab a ladle of starchy pasta water (About 1/3 of a cup) and have your helper slowly stream this into your egg and cheese mixture while whisking like generations of family is watching you. This will help the eggs not scramble when it hits the pasta. Then immediately….
9) Pour that creamy goodness over the pasta and get to tossing and I mean TOSSNG BABY!! Get each and every noodle coated. You will see the sauce firm up as it emulsifies with the bacon fat and really start clinging to the pasta.
10) Add another few (Or 7 or 8) more grinds of pepper and another few grates of cheese and keep tossing.
11) Now quickly check for consistency, If it’s too loose and more cheese. If it’s to tight add a little more pasta water and keep tossing. If it’s just right, Divvy up that pasta and spoon the bottom lardons over each bowl, then another crack of pepper and a couple grates of cheese and…
12) EAT…immediately (or the second Frenzy as I call it)
What you need: (Feeds 3 to 4 people)
1 Slab of OBGG Bacon (apox. 250 grams)
1 Tsp of coarsely ground black pepper (or more if you are like me)
4 eggs (best you can afford)
3/4 cup of Pecorino Romano, or Asiago if you’re on a budget (Plus some extra to top)
3/4 cup of Parmesan (best you can afford) Plus some extra to top)
Pasta is kind of what you prefer
I like fettucine or linguini, but spaghetti is fine. You’ll want a box and a half for 4 people or around 750 grams if you can find it fresh.
Garnish with a few leaves of basil or chopped parsley or don't
I'm a fan of a few charred cherry tomatoes on the edge of the plate :)
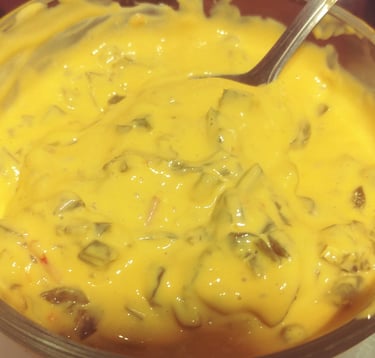
Quesso or as I call it: California Whiz Baby!
This is something I whipped up earlier this week because (one terrible consequence of the pandemic is) all my go to Philly Cheesesteak places started to really suck. Pretty much the only reason I eat out (and I'm sure most of you as well) is because I like stuff that I'm either too inept or to lazy cook myself. Cheesesteaks is the later, but when that craving hits you, it's time to step up and slice up a steak. Anyway long story short finding cheez whiz (not in can form) is not so easy in my part of town, so I figured I'd make something REALLY bad for me and call it cheat day.
What you need:
250 grams American cheese
250 grams shredded Oaxacan Queso
250 grams shredded Monterey Jack cheese
125 ml whole milk or 1 can of evaporated milk (low fat)
1/2 tbsp or 10 g butter
50 grams chopped Smoked jalapeños
50 grams chopped OBGG Cajun Spiced Pickled Jalapeños
1 tbsp corn flour / cornstarch
1/4 small white onion, very finely chopped
1/4 tsp each onion powder, garlic powder, cumin
Optional: a small diced tomato
How you do it:
1) Cube/dice/shred all your cheeses and put them in a glass bowl (we will be double boiling this) and toss them in the cornstarch until everything is coated
2) Grab a sauce pan and Melt butter over medium heat and add the onion. Lower the heat to low and cook real slow until is translucent but browning. Then add the tomato if you like and let it stew for about five minutes or until the fruit is soft under your spoon.
3) while that is happening add a few inches of water to a pot big enough to hold your cheese bowl on top and get it boiling on high heat.
4) Put the cheese bowl on top (This is called double boiling chitlins) and add the buttered veggies, Milk and/or Evap and get to tossing and stirring
5) Once it starts getting melty and gooey you can add the dry spices and whatever else the meets your fancy. Likely salt from the cheese will be enough but a few cracks of black pepper never hurt no one.
6) Now I like a mix of smoked and pickled Jalapenos, but one or the other is just fine. The important thing is to dice the up fine, you dont want clumps. you want smooth cheese kids...smooooth!
The only real thing here is the consistency. Not thick enough add more cheese or cornstarch, too thick add more milk. Be like Goldilocks and get it just right!
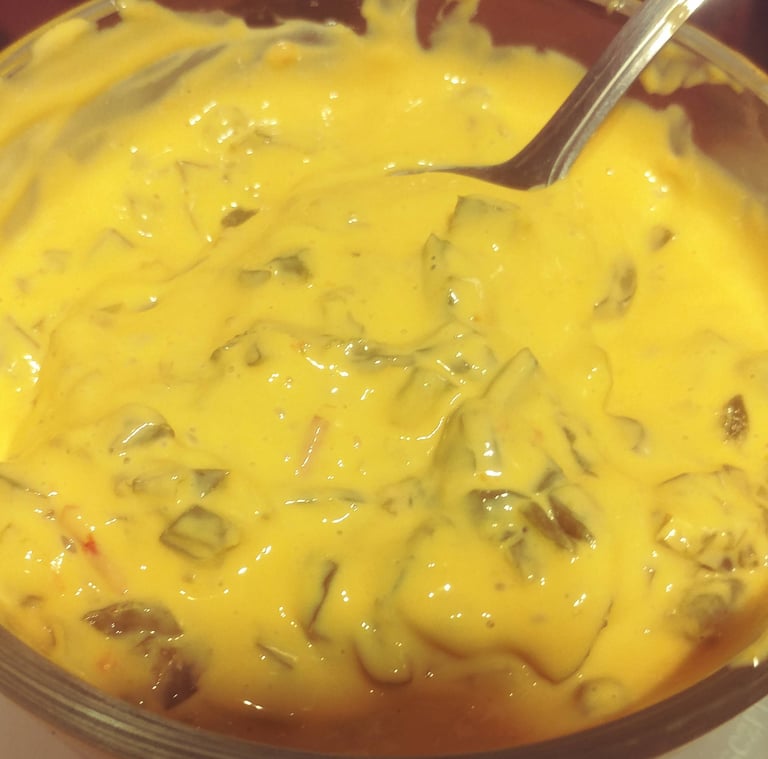
Now I made this recipe to whiz my cheesesteak (sorry there just isn't a good way to say that) but damn if it isn't great with just chips. Or if you really want to get decadent drip it on a bacon jam burger!
OBGG and its affiliates are not responsible for your coronary
Cutter's Lemon Soda
This easy soda will make you never buy corn syrupy soda from the 7/11 ever again!
Here at the Open Bar Ranch we try to cover all our foodies and make something for everyone.
Our latest smash hit was Limoncello, a lemon booze not easily found in America that we felt OBGG fans deserved. However it's also 100 proof and we have A LOT of newly pandemically sober friends who also need some summer refreshment!
So I made this and it's yum-tastic!


How you do it:
First off the hard work! Prep is always the hard work!
1) Zest about half your lemons for the simple syrup. Use a carrot peeler or a paring knife and get the skin off leaving as little white on them as possible. (the white pith is very bitter)
2) Juice those lemons baby, the zested lemons should look like paper when your done with them (you can actually make really nice paper from lemon pith) and with those un-zested lemons you can take a cheese grater or micro-plane to the rest and save for espresso or dry it for pasta dishes. Refrigerate the juice, filter the pulp if you like.
3) Simple syrup is the easiest thing you never make for whatever reason. Grab your least favorite pot and bring 1.5 liters of water to a slow boil I say 1.5 because no one ever really watches water boil so your going to loose a bit to evaporation. Lower the heat and add all your zest and let it steep for about 10 minutes. You want to extract all the oils from the zest and remove when the water turns a bit yellow. Depending on your sweet-tooth stir in 500 to 750 grams of sugar till dissolved. Next stir in your 50 ml of honey or my fav trick, throw in 100 grams of raw honey comb. Let it cool down to room temp and transfer to a pour friendly pitcher and stick it in the fridge over night. Side Note: clean your pot immediately, simple syrup will turn into a stone coating of impossible if you let it dry.
4) Now the fun part! Whenever you feel like having a nice porch sit you have everything you need. well hopefully you have a glass bottle or a large mason jug.
Fill 250 ml of lemon Juice, 250 ml simple syrup and 500ml of seltzer or there abouts depending on the size of your container.
Like it less sweet, Less syrup. More bubble, give it a shake!, the world is your oyster. Takes about three tries to get it exactly how you like it!
What you need:
15 pound sack of lemons (or whatever falls off your tree)
250 ml from scratch simple syrup (per liter)
50 ml Honey
500 ml seltzer water
Optional: pinch of cayenne pepper (per liter)
Garnish with anything you like:
OBGG Candied Lemons and Limes
Gin
Perhaps a sprig of mint
You do you friends!
OBGG Poke! Damn Right I Said PO-KAY!
One of my best friends finds herself with high blood pressure and needs to go on a diet to rectify that sad fact. What she doesn't know is that it doesn't mean you have to eat Kale all the damn time. So I start making her sushi every day for lunch and all is well with the world.
What I didn't know is that making sushi rice is bloody hard! 1 out 5 times I screw it up and have to start over. After one such day, she was busy and wouldn't be around and I thought you don't need perfect rice for Poke!!! And all is well with the world.
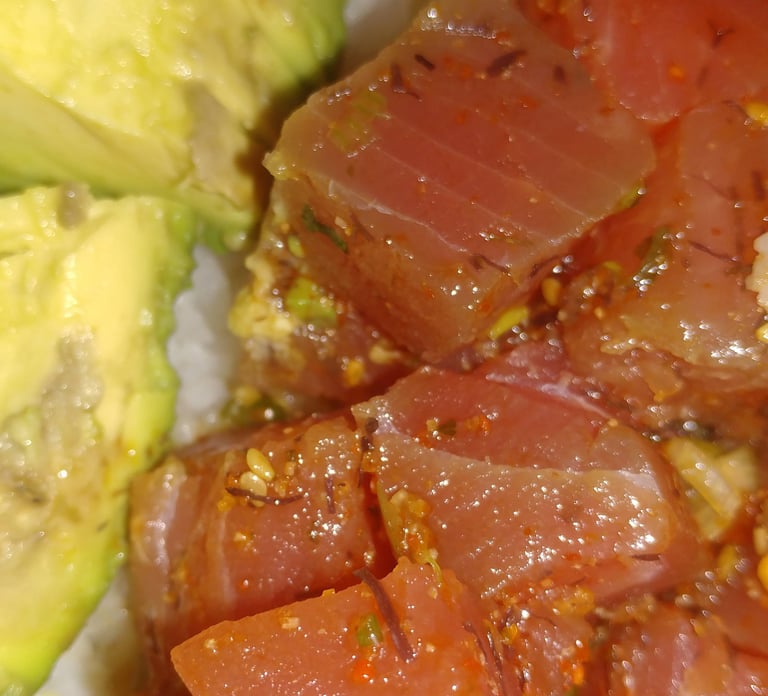
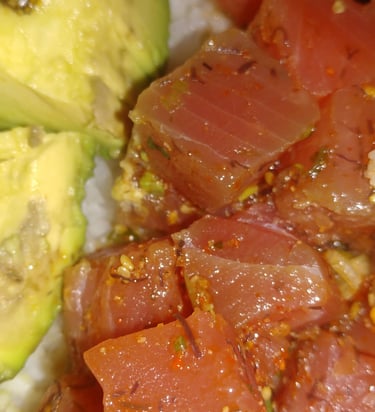
What you need:
60 ml OBGG Tamari (Or Low NA Soy Sauce)
2 tsp. rice wine vinegar
2 tsp. sesame oil
1 tsp. freshly grated ginger
Pinch of crushed chilli flakes
2 spring onions, thinly sliced, plus more for garnish
1 tsp. toasted sesame seeds, plus more for garnish
450 g sushi-grade ahi tuna, cut into bite-size pieces
200 g short grain sushi rice
Garnish with anything you like:
Sliced avocado or cucumber, Edamame,
Shredded carrots,
radish, Jalapeno etc
How you do it:
I swear its the easiest dish in the damn world!
1) Prep your tuna by slicing into 1 inch cubes. You can go bigger or smaller (It aint no thing, go with your mouth size)
2) In a large bowl, whisk together soy sauce, rice vinegar, sesame oil, ginger, chili flakes, spring onions, and sesame seeds
3) Add tuna and toss well to coat
Serve in a bowl of lightly packed rice and top with Poke and garnish
Seriously That's it, you have no excuse not to make this! And perfectly covers up the fact that your sushi rice is sticky and starchy :)
Now what you see here is a bare minimum recipe, Hawaii blessed us with this idea to expand on. Don't like chili flakes? replace with a clove of garlic. Chili isn't enough heat? Add wasabi paste.
Go nuts my poppets!
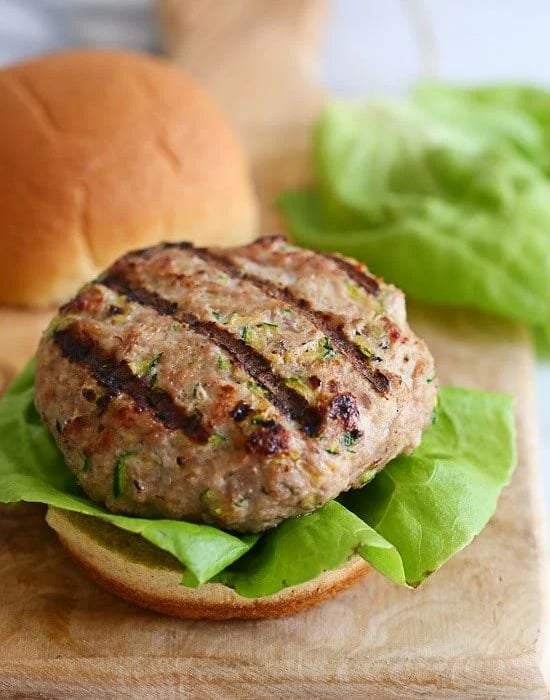
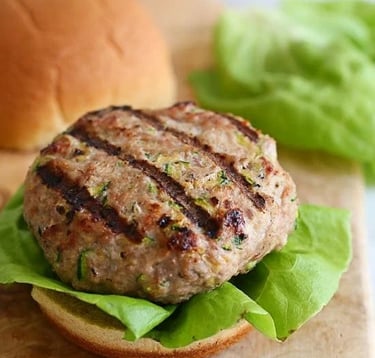
Cutter's Bombastic Turkey Burgers
This recipe came about after many many failures making turkey burgers that were dry or fell apart or just tasted crappy. Then it hit me like this Scottish girl I knew in university, Turkey is not cow, stop trying to make a turkey burger a hamburger! Figure it out man!
So I did, and here we are.
BTW this recipe was made for Bacon Jam! Buy it or make it, just use it!
What you need:
3 pounds of ground turkey (I recommend grinding your own turkey because the store bought ain’t right, but do what you got to do. Check out my pointers for grinding your own turkey at the end of this recipe.)
1/2 cup breadcrumbs (just stick a day old baguette in your food processor with some salt and pepper)
1 large egg
1/4 cup EV olive oil
1 smallish sized white onion
4 to 6 good sized green onions with lots of green
salt and pepper
Optioal:
Add your fav herbs/veggies into the burger mix. I've used chives, bell peppers even cilantro a couple times, the world is your oyster so to speak.
Recommended Accoutrements:
Your fave buns (I like a brioche bun for my turkey burger but I don’t judge)
That there OBGG Becca Bacon Jam and maybe some
OBGG Get Your Groove On Dijon mustard
Cheddar cheese, tomatoes, and Boston head lettuce
How you do it:
1) In a bowl, mix together the ground turkey, breadcrumb, egg, and olive oil. Get your hands dirty and really work the meat. The breadcrumbs, egg and fat serve as a binder to keep it together so this is one step not to skip, trust us there’s is chemistry going on here.
2) Dice up the white onion and about half of the green onion then add them to the mix.
3) Now you can start making some patties, About 4 oz (quarter pound)
4) Preheat your oven to 325. Break out the trusty cast iron and get it ripping hot with some canola or grapeseed oil.
5) S & P the burgers, then sear the crap out of them for 30 seconds to a minute on each side.
6) Put the seared patties in the oven — you can either place them on a wire baking sheet with a little water in the pan, or just add a little water to your cast iron and shove it in there. Cook the patties until their internal temp is at least 160 degrees.
7) When you are ready to serve, brown some butter on med heat and toast those buns up — no one likes an untoasted bun.
8) In the same pan you can melt a slice or two of cheese on each patty. Just remember to cover the pan, ‘cause cheese don’t melt right in an uncovered pan. (If you have stubborn cheese add some water to the pan and let it steam a bit.)
9) The final step is to stack your burger however you like, but I suggest going from the bottom bun and hitting it with that OBGG Dijon, lettuce, tomato, and burger, before smearing a ton of OBGG Becca bacon jam on the top bun. And garnishing with that leftover green onion. And there you have a Bombastic turkey burger.
Going all out and grinding your own turkey, are we? …You da BOMB!
Use 2 lb. of dark meat to 1 lb. breast meat. Cut the meat into 1-inch chunks, then place the chunks in the freezer for about 45 minutes — they should be firmed up but not frozen (put the blade of your food processor in the freezer as well).
Use your food processor to grind the meat in half pound batches (about the size of your fist) and place it a large mixing bowl. I recommend using stainless steel bowls when dealing with birds because they have bacteria you don’t want finding a home in your plastic or wooden bowls.
So I'm not giving away all our secrets here, There is an art to curing and smoking pork that i'm not going into..... HOWEVER, this is the general gist of how we do it. Everyone deserves some bacon jam in their lives!
The Becca Bacon Jam
What you need:
1 lb. bacon, cut into 1-inch pieces
1 onion, finely chopped
4 shallots, minced
2 cloves garlic, minced
1/2 c. brown sugar
1/4 c. maple syrup
1/3 c. apple cider vinegar
1/2 c. potato vodka, e.g. Kettle One
1 tsp. chili powder, 1 tsp. soy sauce, 2 tsp. coffee
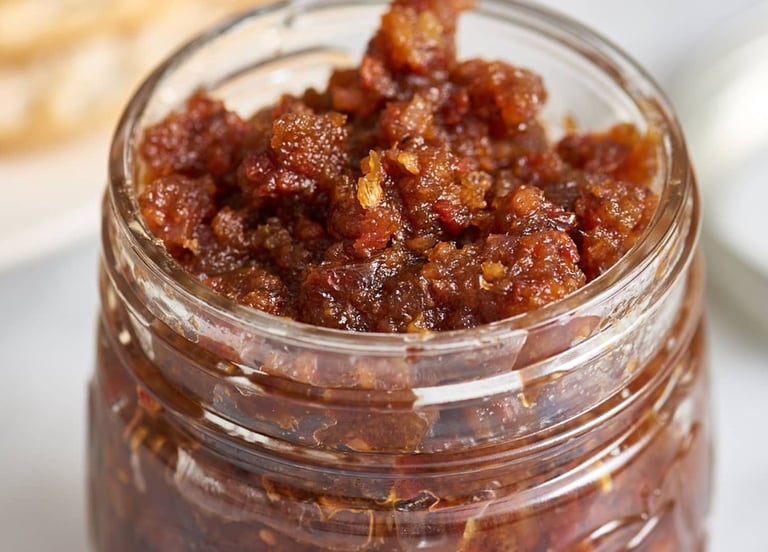
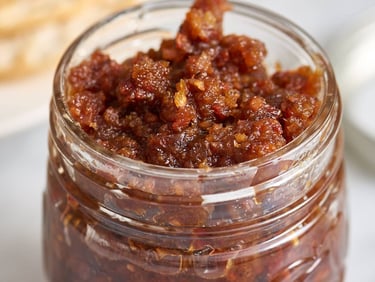
How you do it:
1) Start the bacon off in a cold cast iron pan on medium low heat. You want to cook off all the fat without burning it, so you pretty much have to sit there stirring it with a wooden spoon for about an hour. (I recommend listening to a fun podcast to help pass the time.)
2) When that bacon is crispy and swimming, separate the fat from the bacon with a fine meshed strainer or coffee filter and set both to the side. (Always save that fat baby!)
3) Take about 1/3 of the fat and place it back in the cast iron, stirring in the onion and shallots so they can start caramelizing. Set the heat to medium low and take your sweet time, until the onions are a deep, deep brown (like mahogany). This will probably take around another hour.
4) When those onions are lookin’ sexy, turn the heat up to medium and add the garlic, gently stirring everything together. After about three minutes (when the pan is up to temp), add the vodka and deglaze, making sure to get all those bits that have stuck to the pan. Be thorough about it — you want it all, you want it all bad.
5) Stir in the AC vinegar, brown sugar maple syrup, soy sauce, coffee (blacker the better), and chili powder. You can add more than a teaspoon of chili powder if you want an extra kick (I usually use 3 tsp. for my turkey burgers, but I’m fire like that.)
6) Once this mixture is all bubbly smooth, reduce the heat to medium low and cook for another ten minutes or so until most of the liquid is cooked off.
7) Remove the cast iron from heat and scoop everything out into a food processer. Give the processor a couple pulses and then blend in the bacon. Depending on the texture of the mixture, you can then add another half or so of the remaining bacon fat and blend till its… well, jam-like.
Eventually I’m going to teach you how to make the best southern fried chickie sandie, I figure I had better teach you guys how to make butter and an equally beautiful buttermilk brine. Keep reading to learn an easy magic trick that is sure to impress your stupid friends.
(You can double or septuple this recipe depending on how much chicken you plan on frying.)
I Can’t Believe You Made F*****g Butter… Butter
What you need
2 cups pasteurized heavy/whipping cream the more milk fat the better (DO NOT use ultra-pasteurized)
½ cup of unflavored Kefir
2 (big) tsp. sour cream
High quality sea salt


How to do it
1) Mix heavy cream, Kefir and sour cream. Cover with cloth, and let it sit for 12-24 hours. This will bring the cream back to life, you need that bacteria in raw milk for it to work and this process is as close as we’re going to get in America. Anyway science! Magic ! What have you!
2) After it’s done its thing, stick in the fridge for about an hour.
3) Use your mixer or food processor to whip it! Whip it good! ‘til the butter has separated from the liquid. You’ll see it change from whipped cream to butter real quick… Bloody magic.
4) Strain everything through cheese cloth and the twist the cloth into a ball, squeezing it ‘til you see the butter start pushing through. Then stop 😊 don’t actually push it through.
5) Jar up what’s left (I told you earlier Buttermilk liquid gold for brineing chicken).
6) Place the butter in a new bowl and pour a little bit of ice water over it. Knead the butter, and drain the water. Repeat this process until water comes out clear. Don’t be lazy, just effing do it. You may have to do this ten or fifteen times but it’s worth the effort.
7) Top the butter with sea salt and go to town! Make some toast, bake a crumpet!
Homemade butter is probably something your ghetto palate has not experienced before and needs to. Also save the damned butter milk.
As many of you know Chef Cutter is from DC and one of the things the area is famous for is Chesapeake blue crabs! This is a super easy recipe from his youth that will get everyone wanting to be your friend
Classic Maryland Crab Cakes
What you need:
1 lb. jumbo lump or backfin lump Blue crab meat, fresh is best but I know how it is
1 large egg
1/4 cup mayonnaise- Make it yourself, I believe in you
1-1/2 tsp. Dijon mustard
1-1/2 tsp. Old Bay seasoning
1 tsp. fresh lemon juice
1/2 tsp. Worcestershire sauce
½ tsp Kosher salt
1-1/4 cups fresh breadcrumbs (from cheap white sandwich bread)
1 Tbs. chopped fresh flat-leaf parsley
2 Tbs. unsalted butter
1 Tbs. olive oil
Lemon wedges for serving

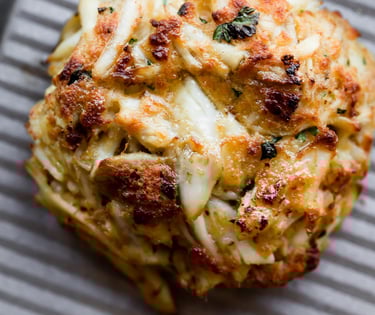
How you do it:
1) Drain (if you have to) the crab meat and break up any large clumps, make sure there aren’t any shell fragments in there, that stuff will make you cry if your guest bites into one. We are looking for a one inch strands of meat. Don’t worry about making it too uniform we just need it to cook evenly
2) In a small bowl whisk the egg mayo and mustard together and get a good base then add the old bay, then the lemon juice and Worcestershire sauce. I should be loose but sticky like a thin BBQ sauce.
3) Now be gentle and fold in the mixture, just get it all coated, try not to damage the crab meat or it’ll turn to mush. Gently is the key!
4) Add the bread crumbs and parsley, and again fold it gently until you have a pretty uniform coating on all the meat, fluff it up with a fork if you have to. Cover and stick in in the fridge for around 3 hours
5) Shape the crab mixture into 8 cakes about 1 inch thick. No need to be huge and blue crab is money so keep them small. In your cast iron heat the butter with the olive oil over medium heat. When the butter is frothy, add the cakes to the pan (8 should fit comfortably). Cook until dark golden brown on the underside, about 4 minutes. Flip the cakes, reduce the heat to medium low, and continue cooking until the other side is well browned, 4 to 5 minutes.
6) Serve with lemon wedges on the side for squeezing over those bad girls!
Ghetto Gourmet Fried Chicken Sandie
Before we get started Ill say a few words about buttermilk brining your damned chicken.. Fried chicken needs to brine no matter what style you like. Nashville style add hot sauce and chili, Indian style add curry and cumin, or for the white peoples add lemon and dill. No matter how you like it you have got to use buttermilk.
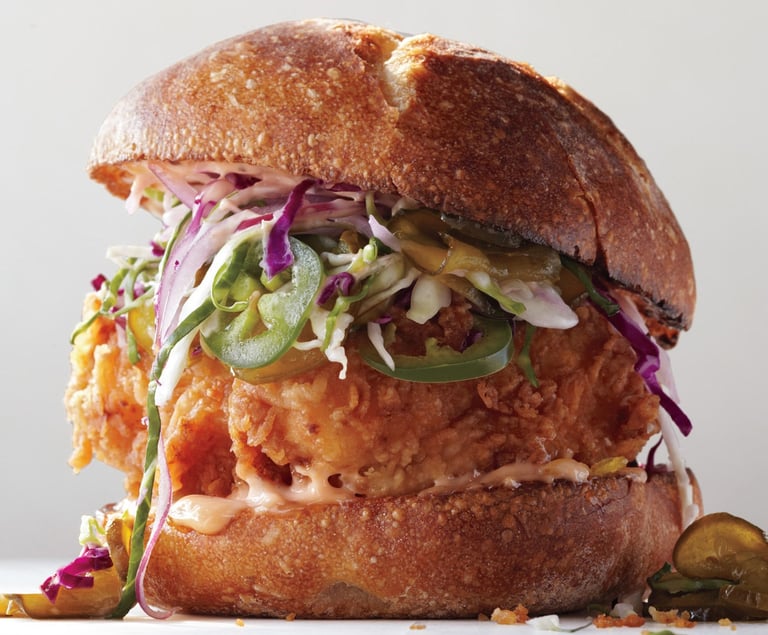

To make all your friends waiting in line for a Popeyes sandwich feel like morons
What you need:
5 Chicken thighs, fattier the better (Thighs are harder to over cook so try it with these first)
Brine- 1 quart buttermilk, 1/4 cup of pickle juice, 4 teaspoons kosher salt, 1 teaspoon freshly crushed black pepper, 2 tablespoons smoked paprika, 2 tablespoons Tabasco, and 2 teaspoons celery seeds
How to do it.
1) Get yourself a large bowl or a bucket mix all that together and make sure you have enough completely submerge the thighs, and stick it the fridge for 24 hours, yup! you have to plan ahead for this little project.
Now its the next day and your ready to party.. I personally have propane deep fryer I use for thanksgiving birds and I never at a loss to throw a nice fry party where friends come by and fry everything from ice cream to twinkies. But I digress, I like doing this outside cause you want your grille handy for this chicken recipe, but a stove top Dutch oven and a wire oven rack will do.
What you need:
1 tablespoon freshly ground black pepper, 6 tbs. kosher salt
4 large eggs
2 cups buttermilk brine
2 tablespoons vinegar-based hot sauce
4 cups all-purpose flour
1 cup of PANKO bread crumbs
Peanut oil (for frying; about 10 cups)
Sauce- 6 Tbs cayenne pepper, 2 Tbs dark brown sugar,1 tsp chili powder, 1 Tsp garlic powder
1 teaspoon paprika, half a stick of butter or bacon fat
I like a brioche bun but two slices of cheep white bread will work
Shredded lettuce
1 or 2 pickles sliced how you like em
Homedale mayo- you need 2 eggs, ½ cup (ish) canola oil, 1 tsb pickle juice, 1 tsp Dijon mustard. A dash of chopped pickle or as much as will make you happy.
How to do it:
Lets make the mayo first, hopefully you have an immersion blender, but people did this with a whisk for hundreds of years.
1) Separate the yolks from the whites and stick the yolks in the blender and give them a 1 second whip
2) Add in the mustard and give it a pulse
3) Add one the whites of one egg (or half what you got Einstein)
4) Now get you blender going and I can’t stress this enough! SLOWLY drizzle in the oil and you will see your mayo come to life
5) About half way through the whipping process add the pickle vinegar and the rest of the oil and viola Mayo that won’t make you barf
6) Place into a small bowl and fold in the chopped pickle with a spoon or whatnot
Now lets make some sauce, Gawdamn!
1) In a small saucepan melt that bacon fat (or butter) and add your spices, That’s it! This is more of a glaze than a sauce so you want it to be thin so it will absorb into the breading but not make it soggy. Just keep that sauce on the cool side of the grille and give a stir once in a while.
All right we’re ready to start frying bird parts!
1) Set up two bowls one with flour, Panko and salt, and one with eggs and buttermilk brine, whisk the egg and buttermilk till there are no streaks left. And a small drizzle of this to the flour and mix it in to you get some nice little clumps
2) Get that oil to at least 350 degrees, if you got a rig like mine you can go to 425 and be happy, and wear a bloody apron this is serious business
3) Pat dry your thighs (Heh) with a paper towel and dredge it in the flour and really pack the flour into every nook and cranny, then give a dunk into the egg wash and let the excess drip off and the hit the flour again
4) Now we want to fry these one at a time or in small batches cause we need to keep the oil hot as hell, it should only take about a minute to get a nice crispy fry skin…don’t worry about the the internal temp yet…just concentrate on the skin super crispy golden brown, you know what it looks like.
5) Remove from the deep fryer and place on the grille (around 325 is the temp you’re looking for) Brush down all the chicken with your lard sauce, just a once over light brushing and cook till the internal temp is 160 degrees.
6) When you’re ready to plate, TOAST those buns! I always say no one likes a raw bun. Use some of the lard/butter sauce and stick them on the grille.
7) Just shredded lettuce and mayo on the bottom, piece of chicken. 2 or 3 pickle slices and light mayo on the top bun. If you want to get all fancy take some mayo and make a fancy coleslaw with you favorite spicy peppers. And "Damnit Janet" You are in heaven.
OBGG Mac & Cheese Son!
Because You Deserve It!
Easy to Make, The Bomb to eat!
I have faith you all can handle a light roux :)
With the Covid Holidays coming up and depression abounding what better comfort food could there be than a big old creamy pan of Mac and Cheese. Of the million recipes out there ours is certainly not the best, but ours is the Ghetto Gourmet-est. I know you’re on a budget so here is a recipe that will wow your tummy and not break your wallet!


What you need:
1 stick butter, plus more for baking dish
1 lb. elbow macaroni
1/2 cup flour
5 cups whole milk
1 1/2 tsp. kosher salt
Freshly ground black pepper
1 tsp. mustard powder
3 cups shredded cheddar (ok to get the pre shredded bag)
2 cup shredded Gruyere (optional, you can sub in Jarlsberg if you’re on a budget)
1 1/2 cup grated Parmesan, (2x ¾ cup portions) (use real cheese, doesn’t have to be the good stuff)
1 cup panko bread crumbs
3 tbsp. extra-virgin olive oil
Freshly chopped parsley, to garnish
How to do it.
1) First step is easy… preheat the oven to 375 F… I swear people forget to do this.
2) Cook the macaroni al dente, follow the times on the box, drain and set aside
Now for the cheeeeeeese! We are going to make a light roux…don’t be afraid!
1) In a large saucepan/pot, melt 1 stick butter over medium high heat. If you have a sifter use it otherwise do your best to sprinkle in the flour at a steady pace while stirring vigorously with a whisk or whatever you have the lets you stir vigorously. Do this until all the flour is incorporated with the butter and let cook until golden light brown, probably around 5 to 8 minutes.
2) Pour in milk and whisk until everything incorporated, add mustard salt and pepper and lower the heat to medium and simmer until the mixture really starts to thicken. About 5 more minutes (keep stirring, just not vigorously)
3) Remove pan from heat and whisk in cheddar, Gruyère*, and half the Parmesan. Continue whisking until melted and smooth (I mean you can use all the cheese, cheese ratios are open to interpretation)
4) Mix in the macaroni, and mix it good, you want cheese inside and out, this is arguably the most important step.
5) Grease up your backing dish with any butter you have left try to get a good layer all up the sides and transfer your mac and cheese. Even it out but don’t make it to pretty you want to get some good crunchies on the top.
6) In a small bowl, combine remaining Parmesan with Panko and oil. Sprinkle mixture over macaroni, then season with more black pepper.
7) Bake that goodness until bubbly and golden, 25 to 30 minutes.
8) Let sit for 10 minutes before serving so you don’t injure your guests and garnish with chopped parsley
or
Curry Chicken To Serve A Long Winded British Author Drinking Himself To Death
Morat's Pub Curry Chicken
This is a creative expansion on a recipe I got from hanging out with too many Brits, who have great taste in whiskey but not much else.


What you need:
4 split chicken breasts, cut into 1-inch cubes (I recommend brining these in buttermilk overnight)
1/2 tsp. salt, 1/2 tsp. pepper
1 medium onion, chopped
4-5 medium carrots, chopped into 1/2-inch pieces
4 cloves garlic, finely chopped
1-2 Thai red chili peppers, finely chopped
1 tbsp. tomato paste
1 1/2 tbsp. curry powder, 2 tsp. flour, 1/2 tsp. turmeric, 1/2 tsp. ground cumin
1 1/2 tsp. minced ginger
2 cups hot chicken stock
1 cup table cream (18% M.F.)
1 tbsp. sweet mango chutney (Coming soon from the OBGG test Kitchen)
Recommended Accoutrements:
Basmati rice (how much is up to you)
Naan
How you do it:
1) Heat vegetable oil over medium-high heat and add chicken pieces. Season these in the pan with kosher salt and pepper. Cook until chicken is white on all sides, about four to five minutes.
2) Add onions, carrots, garlic, and chili pepper. Cook over medium heat until onions are softened — not fully caramelized, just toasty brown.
3) Stir in tomato paste, coating the vegetables and chicken.
4) Toss in the curry powder, flour, turmeric, cumin, and ginger. Stir this unholy concoction until dry.
5) Add in chicken stock and bring to a boil, then add in the cream. Once it returns to a boil, lower the heat and simmer for 30 minutes, stirring until its nice and thick.
Now, whether you made just enough for one meal or a whole pot, this stuff gets better with time. You can simmer it all night or stick your pot in the fridge overnight and start simmering in the AM — just make sure to gradually add more stock or water as it simmers. (Or just eat it all now — it’s your food.)
6) Stir in mango chutney just before serving. (Keep an eye out for this highly-anticipated OBGG item — “Cause it ain’t Indian unless you got the chutney”)
Serve over Basmati rice or with Naan bread for dipping.